Jira is a Project Management tool in form of a software application developed by company named Atlassian. Jira is a very popular tool amongst agile teams as it allows teams to track issues, manage projects, and automate workflows easily. Many agile development teams widely use this tool for managing their projects. Jira is also used by teams as an effective issues and bugs tracking system.
Mobile App
JIRA is available as a Mobile Application as well for easier access. You can access it on Google Play Store and App Store (iTunes) of Apple. It makes it easy to stay connected with the team while moving anywhere.
Multilingual support
JIRA is multilingual. It supports more than 10 popular languages. It supports – English (US, UK, India), French, German, Portuguese, Spanish, Korean, Japanese and Russian.
Introduction to Jira:
This tutorial aims at giving you overview of JIRA with introduction to it’s fundamental features.
Core Jira Features
There are 6 core JIRA features. Listed below are important and commonly used features in detail for better understanding.
Feature
Description
Boards
JIRA supports different types of boards which provide an immediate status of the project to the team and allows team to quickly review the progress of the project. Borads can be like Scrum Board or Kanban board. You have option to customize the Board as per the team wants requirement.
Task Details
Tasks in JIRA represent pieces of work that have to be done. Tasks can be defined at the individual Team member level to track the progress.
Business Project Template
JIRA supports number of business templates to manage simple or complex tasks.
Notifications
JIRA applications can generate email notifications for various events that happen throughout the lifecycle of an issue. Like an email can be sent for a particular task to the users. You can use @<User_Name> to get the attention of a specific team member in Comments or Description. This way users are instantly notified if something is assigned to them, or any feedback is required from them.
Power Search
JIRA supports a powerful search functionality with Basic, Quick and Advanced features. Use the search tool to find answers like due date, when a task was last updated, what items a team member still needs to finish. Project information at one place, search within a project.
Reports
JIRA supports many reports to track progress over a specific timeframe, deadlines, individual’s contribution, etc. These are easy to configure and display the matrices to the stakeholders to help them analyze how the team is going on.
How to install Jira?
Points to Note
JIRA is a web application. When you use it, it provides a private website to an individual or a set of requested users who create their profile on Atlassian.com.
JIRA is a Java based application. JIRA also supports all OS platforms like Windows, Linux of different versions or MAC, etc., those satisfy JDK/JRE requirements.
At the server side – JIRA can be run as a Windows Service.
JIRA runs on all famous browsers like Edge, Chrome, Mozilla and Safari.
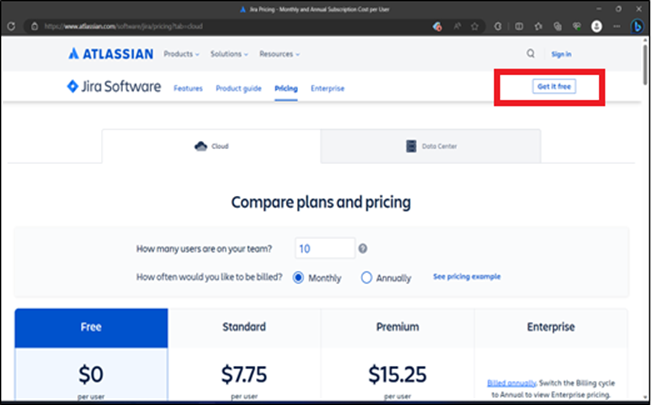
On the Right you see “Get it Free” button. Click on it.
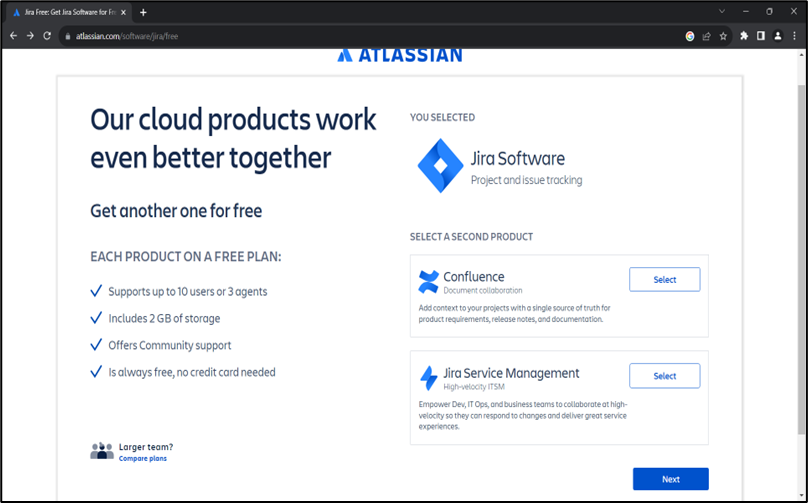
A Product information page will open.
Now Click “Next”
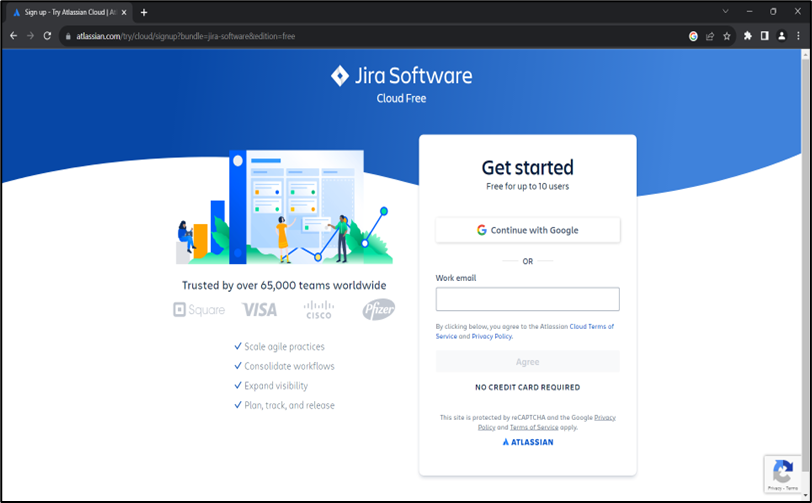
It will prompt you to enter your email id for registration.
An email verification link will be sent to the email id you entered.
Follow the steps to verify the email id.
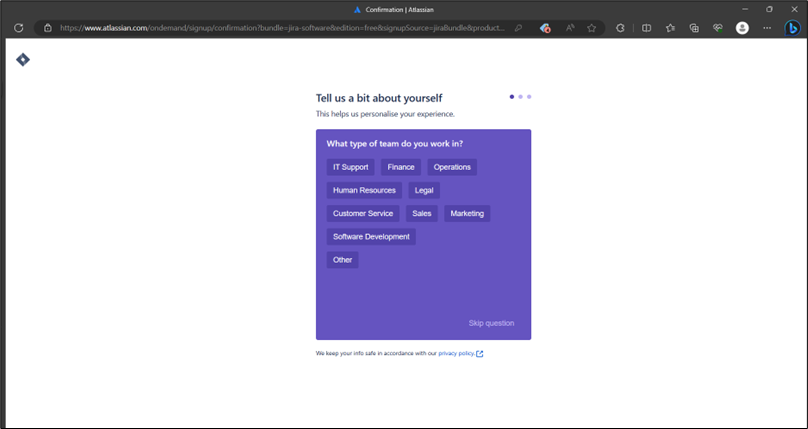
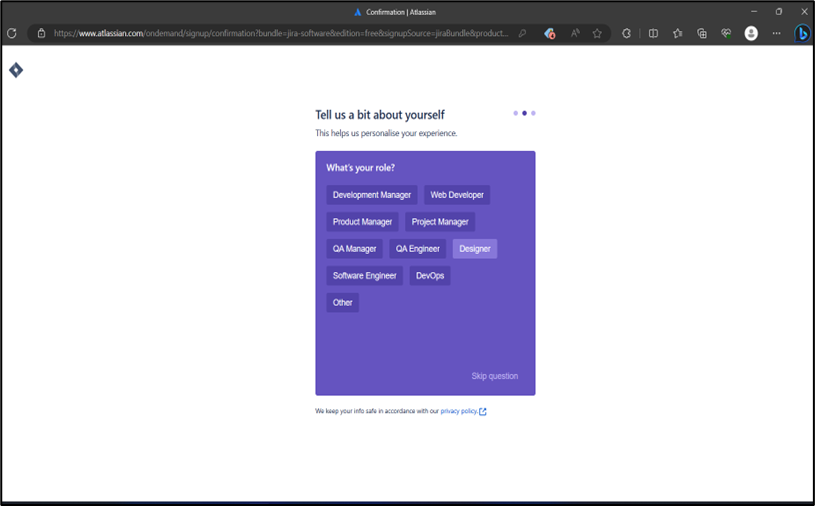
“Tell Us a bit About Yourself” Box will pop up.
Now enter your Work Profile.
On the next prompt “Enter details about your role”
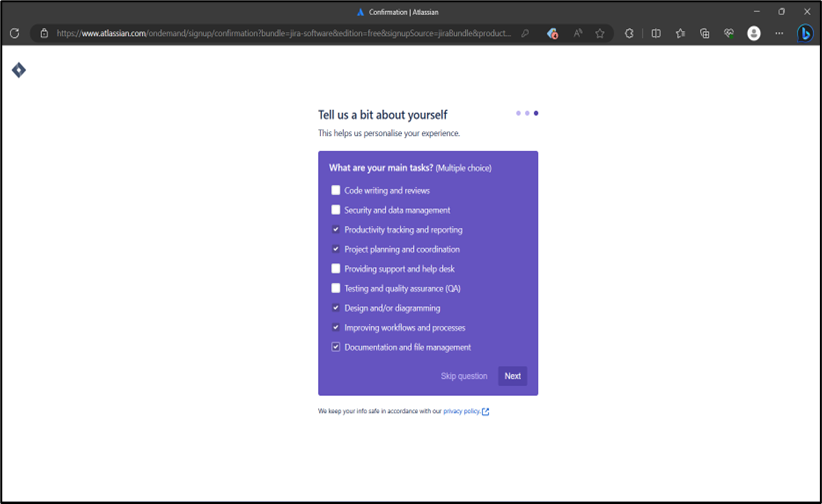
Now Enter your main Tasks related to work profile.
Now the setup will trigger automatically.
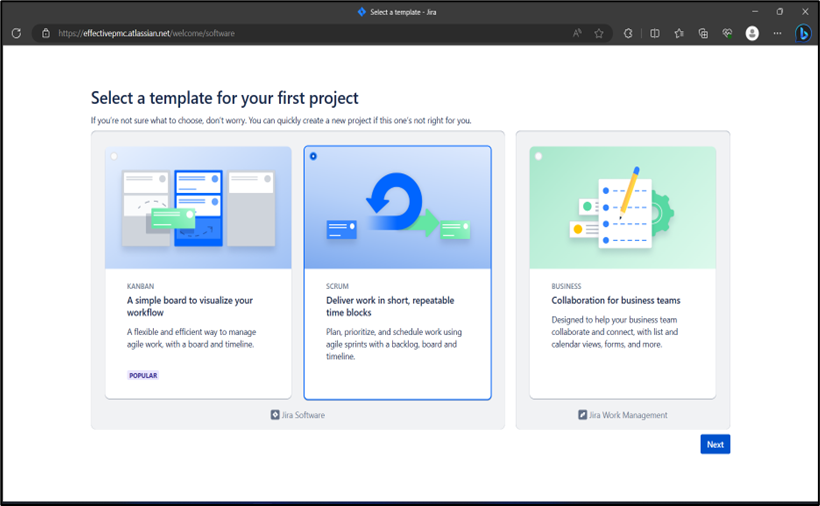
Setup will prompt to select the Project Type which you want to configure in JIRA. It can be “Scrum” or “Kanban” or many more.
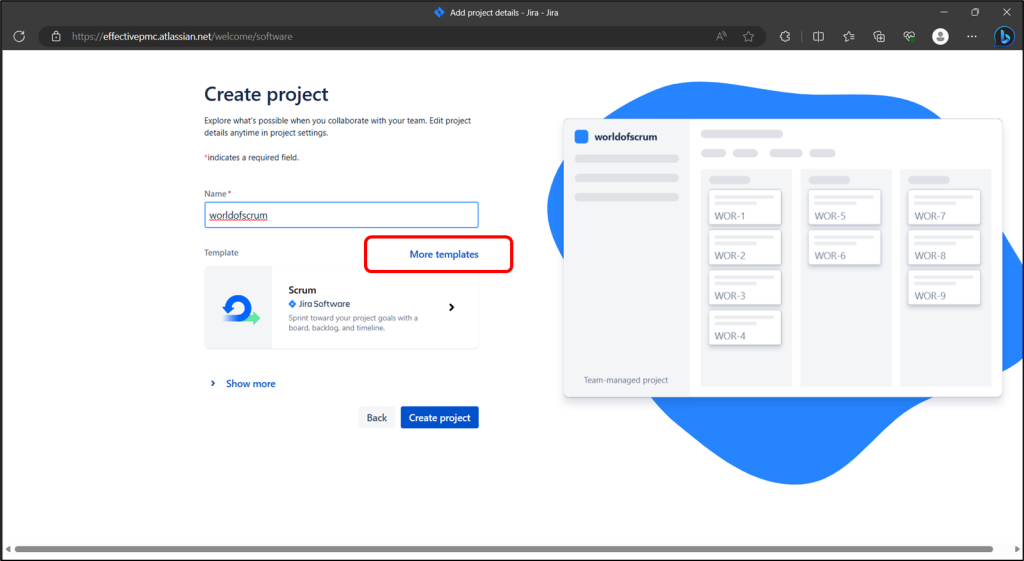
Now on next screen enter Name of your project.
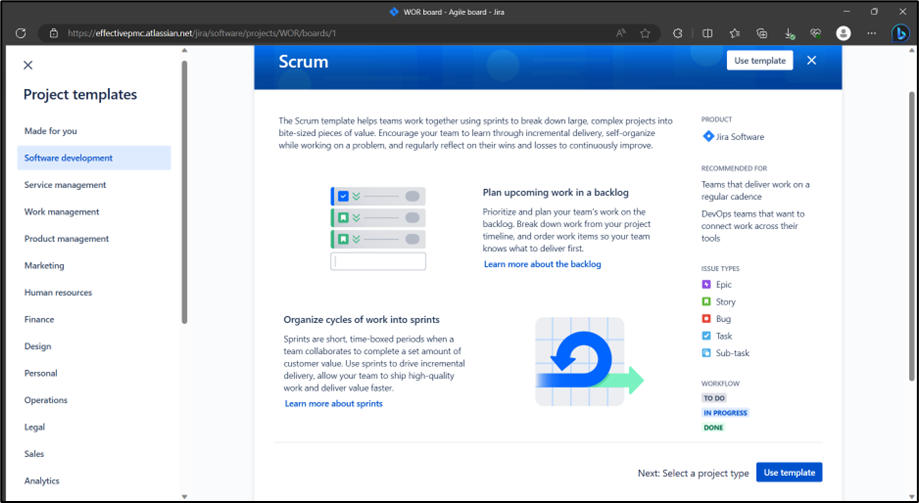
Select project template which your project will use. For this tutorial we will use Scrum Template.
You can click on “More Templates” to view different project templates available in JIRA.
If you want JIRA to work with other tools, pick them on the next screen.
After this final step, JIRA default dashboard will open to display your project.
Start recording your project tasks and stories now on your Backlog.
Use Server-Side Jira Instance
System Requirements
Since JIRA is a web-application, it follows the concept of client/server. It means that JIRA can be installed centrally on a server and users can interact with it through web-browsers using a website from any computer.
Browser − JavaScript should be enabled, the user is recommended not to use any script-blocking tool like NoScript to access full functionality of JIRA.
JDK/JRE − It is recommended to update JRE/JDK with the latest version. JIRA 9.0 recommends using JRE/JDK version 8.
Since our scope is to consume the JIRA application as end users, we can ignore the server-side requirements.
Steps are as follows:
But you are still interested to explore it, then for Detailed steps on how to install JIRA for your Team use Click Here
Now Let’s look at the different Workflow feature & setting which can be setup in JIRA. For all the next section we will be using the Web based JIRA Instance.
What is a Jira Project?
A JIRA project is simply a collection of issues in form of stories, bugs, tasks, etc. You would typically use a project to represent the work which is required for developing your product, project, or service in Jira Software.
Types of Projects
Project that needs to be configured in JIRA can be of several types. For example −
Software Development Project
Marketing Project
Migration to another platform project
Help Desk Tracking Project
Leave Request Management System
Employee Performance System
Website Enhancement
When you create the project, select the template accordingly.
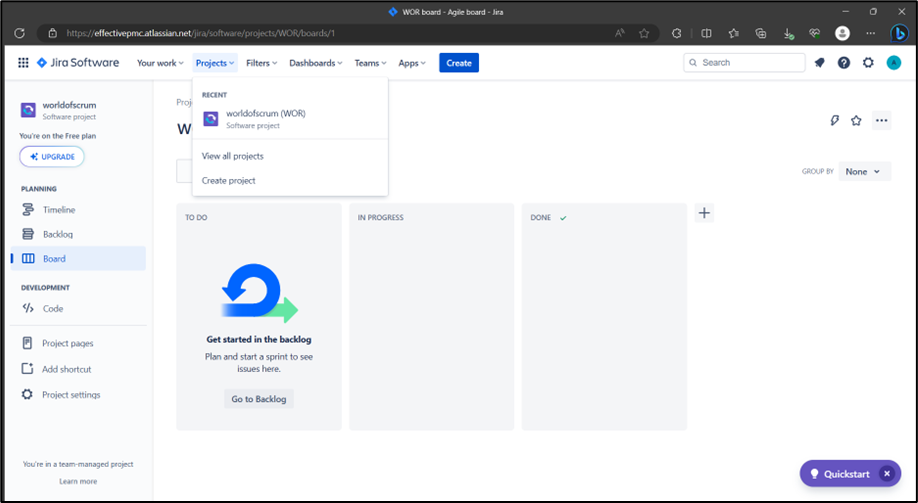
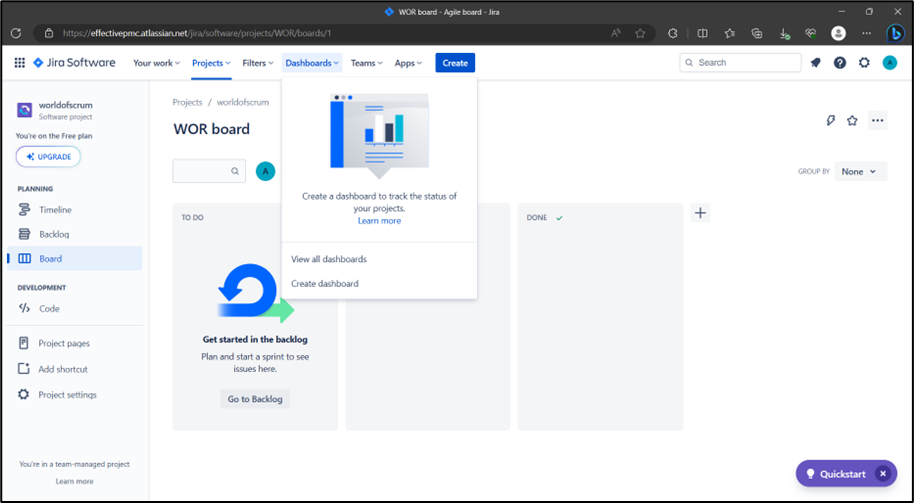
The Projects menu on JIRA Dashboard has several sub-links, which are explained below −
Recent Project − It displays the name of the recent project that the user has accessed, if exists, where the user can navigate by clicking on the project listed under this header.
View all Projects − It displays all the projects, which are associated with the logged in user.
Create Project − we create a new project by following the instructions given. This link is usually accessed mostly to the Admin or how roles are configured.
The following screenshot shows the different sub-links under the Project category.
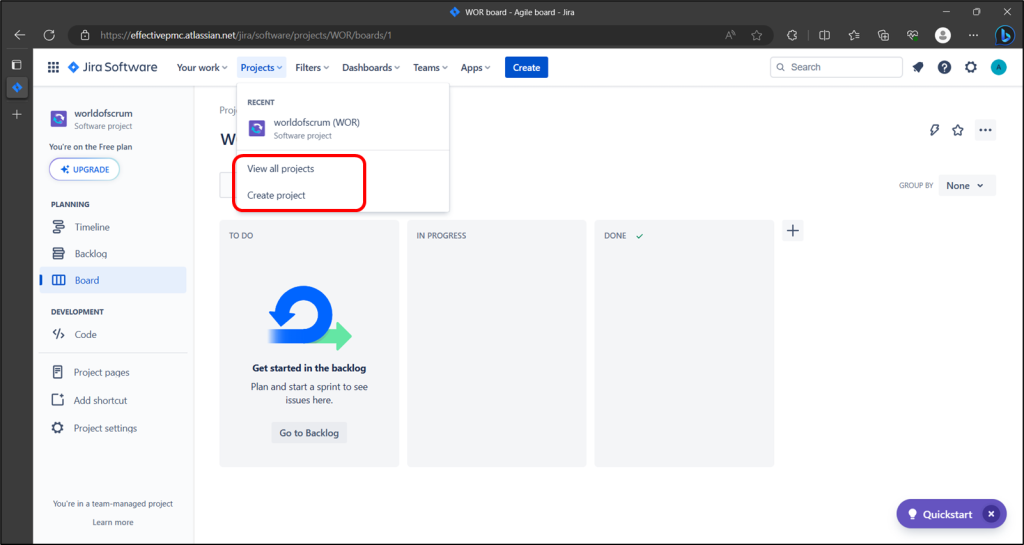
Create a New Project
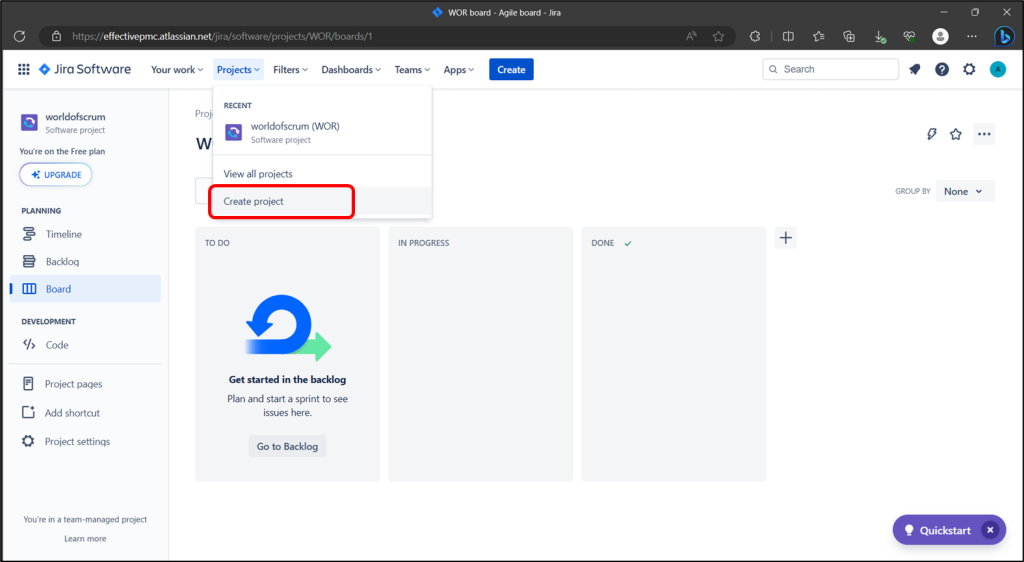
To create a project, the user should login as a JIRA Admin and then Click on Project → Create Project.
The following screenshot shows how to reach to the Create Project button from the Dashboard.
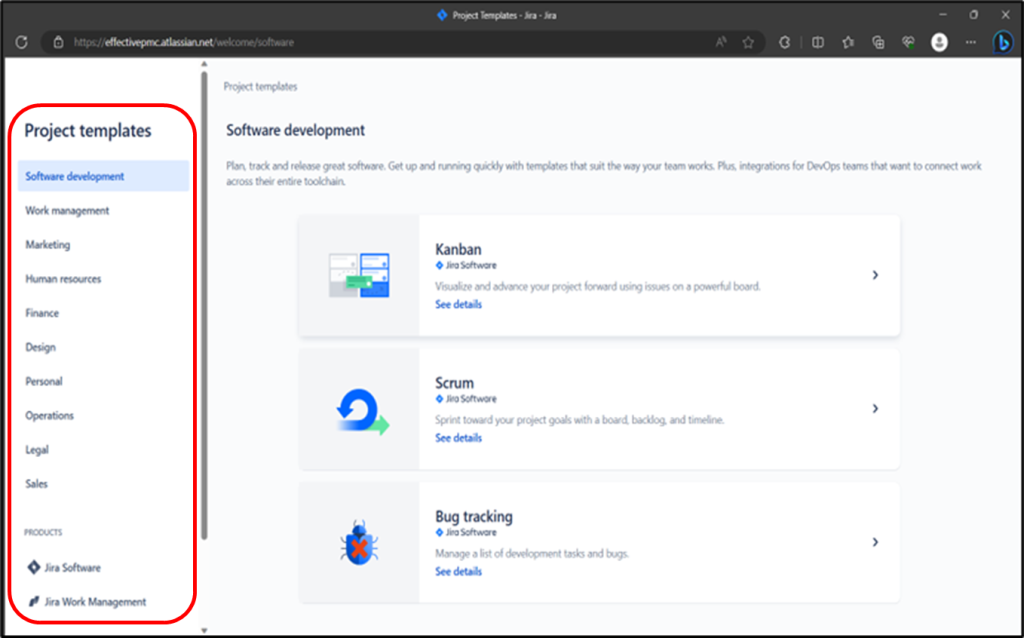
Choose the type of Project that suits your requirement and the process it should follow.
The following screenshot displays the type of projects available in JIRA.
Once the type of project is selected, click on Next. The user will see the workflow of the project based on the selection of template. Here, for our Tutorial we have selected Software development.
The following screenshot displays the available issue types and the workflow for the chosen project in the step mentioned above −
Click on the “Use Template” button.
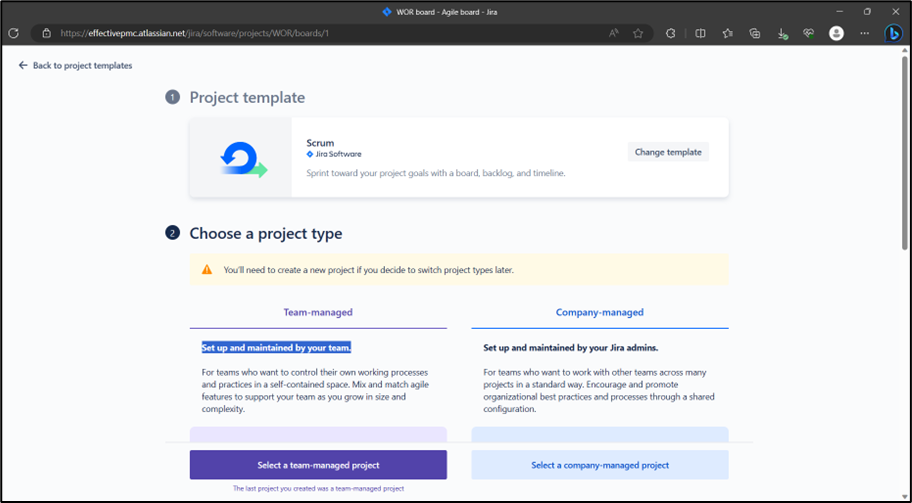
Now on the next screen you will be asked to choose the project Type. Either Team-managed or Company-managed (Refer Server-side Setup for detail)
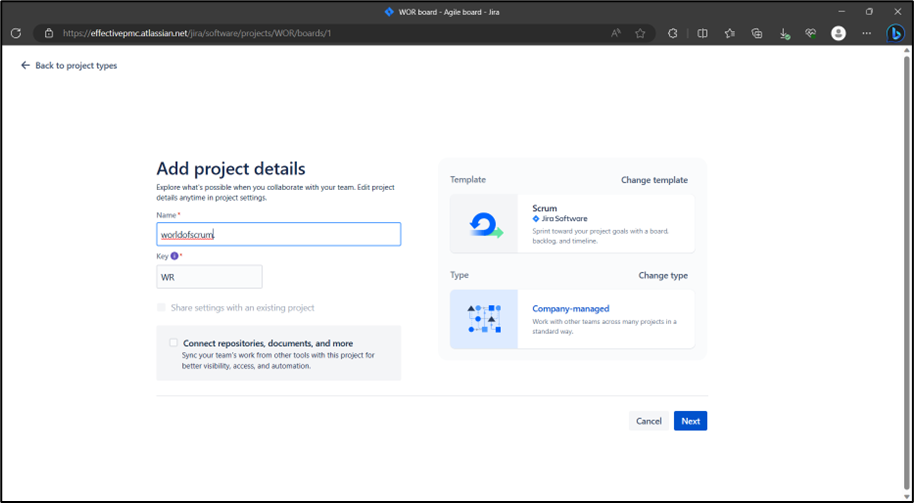
Now “Add Project Details”
Enter Project Name
The following screenshot displays dashboard which is presented in JIRA after creation of a project.
What are issues in Jira?
JIRA uses issues to track all the work needed to be done. An issue helps to track all works that is there in a project. In real time any other type of work done on the project in JIRA are logged as an issue.
An issue can be dependent on the organization and requirements −
User described Story
Task identified for story.
Sub-task of a story
A defect or bug logged in as an issue.
Helpdesk Ticket logged as issue.
In JIRA, workflow is used to track the lifecycle of an Issue.
Workflow is nothing but a record of statuses and transitions of an issue during its lifecycle. A status of workflow represents the stage of an issue at a particular point. There can be multiple status available, but an issue can have only one status at a given point of time. A Issue is “Opened” or it is to be taken up for development “To Do” or is it completed “Done”.
JIRA workflow has the following stages to track as soon as an issue is created −
Open Issue − After creation, the issue is in open status and can be assigned to the assignee so he / she can start working on it.
In Progress Issue − The assignee has actively started to work on the issue.
Resolved Issue − All sub-tasks and works of that Issue are completed. Now, the issue is waiting to be verified by the person who raised the issue. If verification is successful, it will be closed. Issue can be re-opened, if any changes are required further.
Reopened Issue − This issue was resolved previously, but the resolution was either incorrect or missed a few things or some modifications are required. From Reopened stage, issues are marked either as assigned or resolved.
Close Issue − The issue is considered as finished, resolution is correct as of now. Closed issues can be re-opened later based on the requirement.
Types of Issues
An issue has many sub links to access other functionalities.
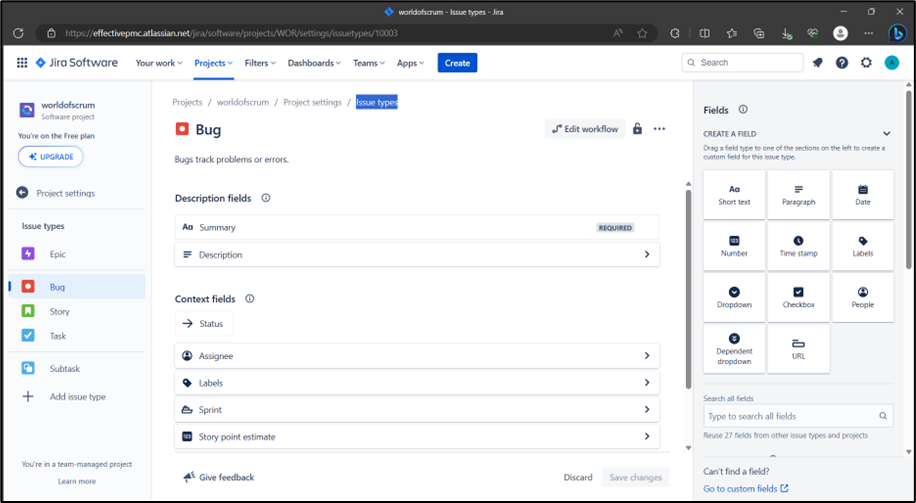
The following screenshot shows different issue types available under JIRA. To access the Issue Type configuration, navigate to “Project-> Project settings -> Issue types”
Types of Boards
Boards in JIRA showcase process that is followed for any Project. It could be the Agile Board if the project is following the agile or scrum methodology or it might be the Kanban board as well.
View all boards − It displays all available project boards
Recent Board − It displays the recent project board accessed by the user.
The following screenshot shows the different options available under the board section.
What are issue types in Jira?
Since JIRA tracks all the tasks, the sub-tasks or even a work as an Issue, there are several types of Issues to identify the work and categorize the similar issues.
An Issue is classified as follows −
Epic − EPIC is a big user story which sometimes needs to be broken down.
Bug − A defect or bug or problem that prevents the any functions of the product.
Improvement − An improvement to an existing feature or task.
New Feature − A new feature to be added for the product, which is yet to be developed.
Story − A user story. Do not edit or delete this.
Task − A task that needs to be done to achieve team’s goal.
Sub-Task − This is the sub-task of an issue. In a logged issue, there can be different tasks to resolve it, which are called as sub-tasks.
JIRA – Scrum Workflow
JIRA presents different workflows. The famous one is Scrum. Scrum is an agile approach, commonly used by developers to deliver the value in the shortest time. Scrum allows you to work iteratively in the development of project’s product. Each iteration is called SPRINT.
How to Use Jira for Scrum?
In Scrum, the team builds the product in a series of iterations called sprints. To get started with a scrum project, you’ll want to create a Jira Scrum project. Jira makes it easy to track and schedule tasks and to monitor progress.
Create a Jira Scrum Project
Navigate to Projects option under JIRA menu -> Click on Create project.
Choose Project template (whatever suits you best).
Choose a project type – Team-managed or Company-managed.
Add project details – Enter a name for the project.
Click the Create button.
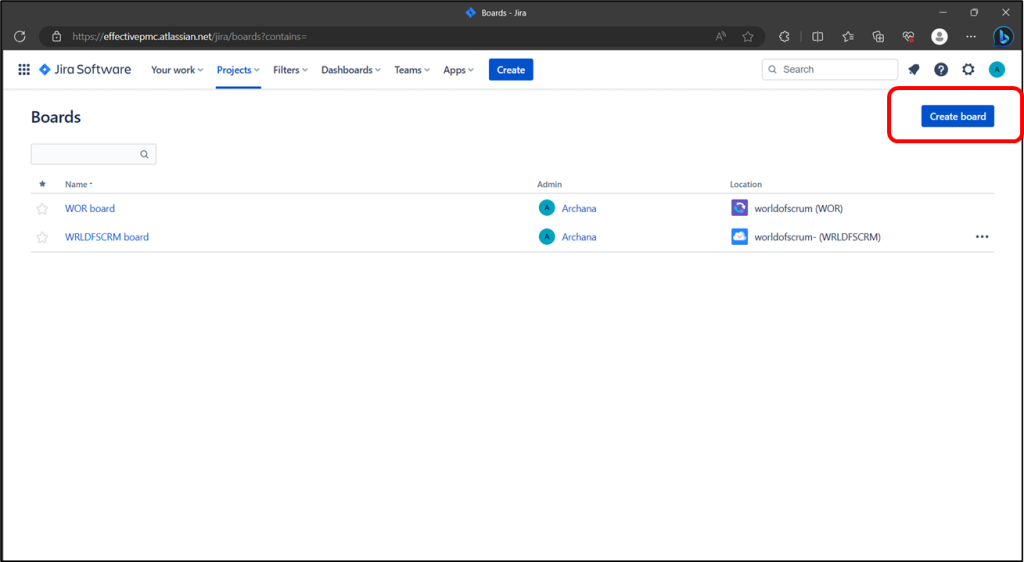
Create a Jira Scrum Board
To track project process with ease you can create a JIRA board. To create Borad from scratch, Go to Search > At bottom you will see “Goto all” option. Click on “Boards”
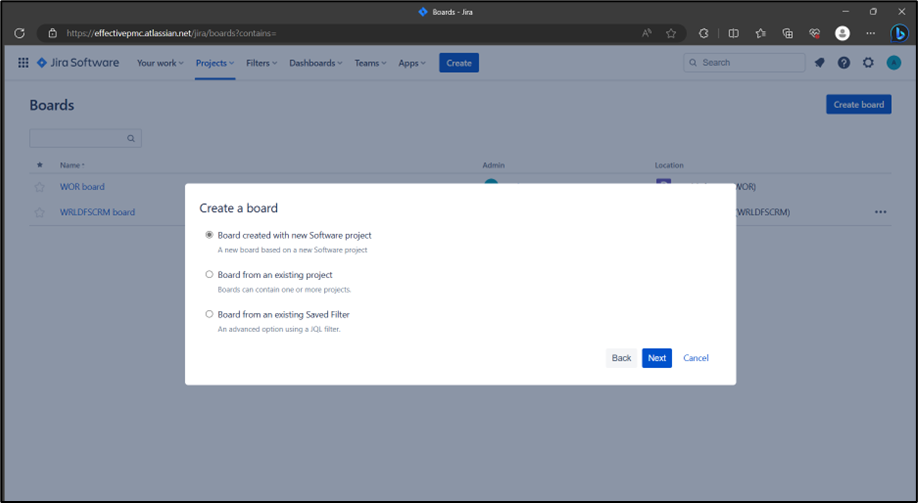
Then click “Create board“.
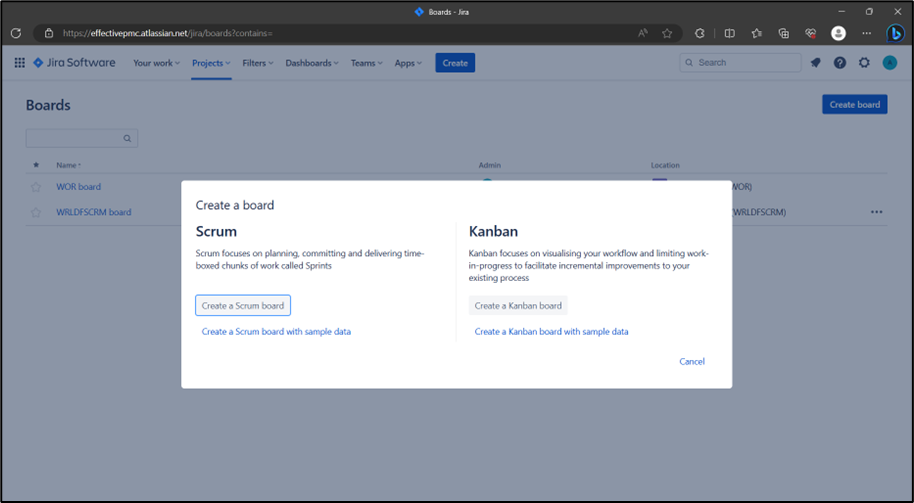
Select board type. We are using Scrum board types for this tutorial.
Select “Board from an existing project” -> “Next”
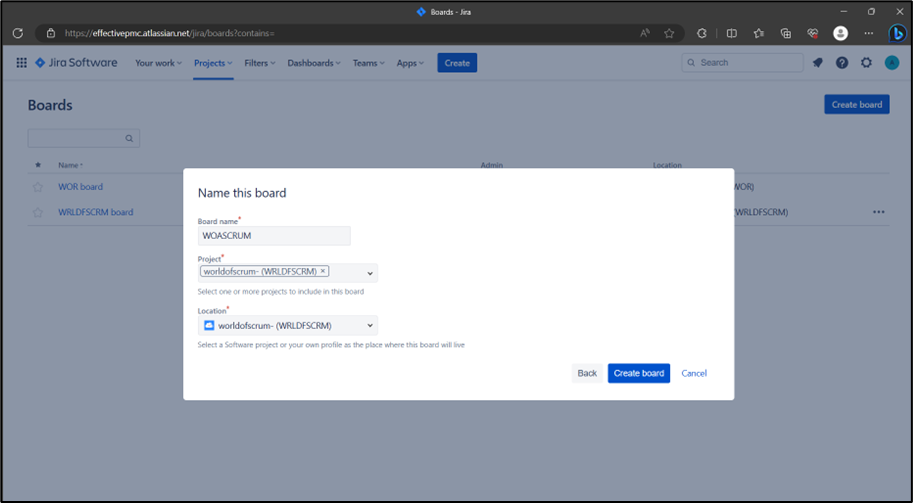
On next screen “Name the board”, Select the project and location. Click “Create Board”
Create EPICs, User Stories, Tasks, and Bugs in Jira Scrum Backlog for the project.
In Scrum, user stories define the requirements in user Language. They help developers to understand who needs a product? what benefits they need? Etc. JIRA defines User Stories, Tasks, and Bugs in form of “Issues” Let’s look at how to create issues or EPICS
Create an EPIC
High level or BIG user stories are called EPICs. They can be further subdivided into stories and subtask.
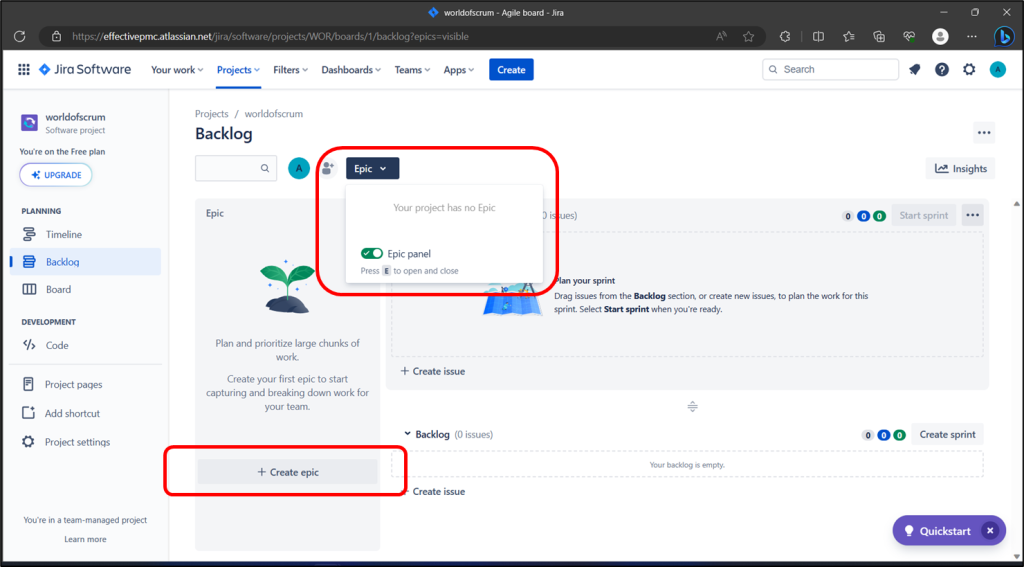
To create an EPIC on JIRA follow the below steps:-
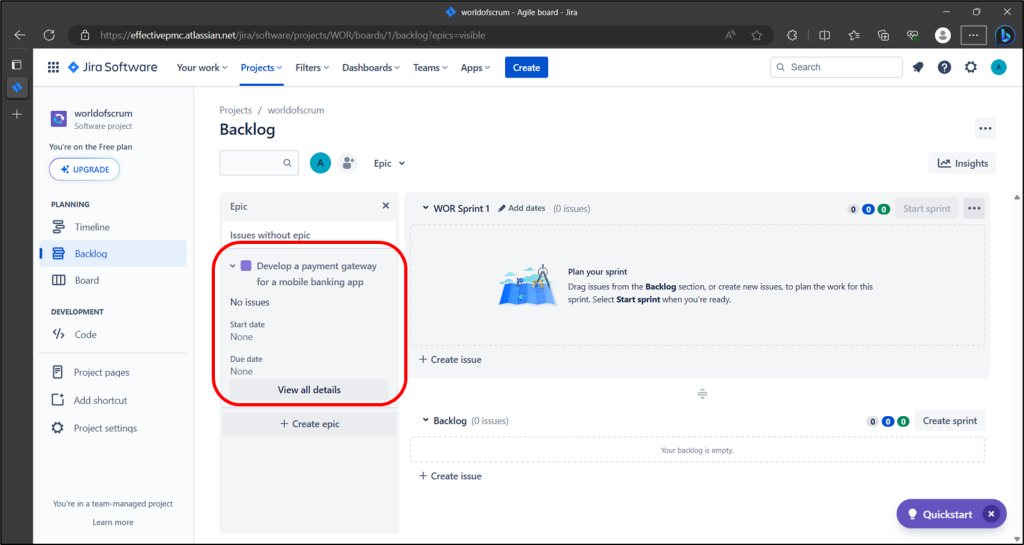
Open EPIC’s panel
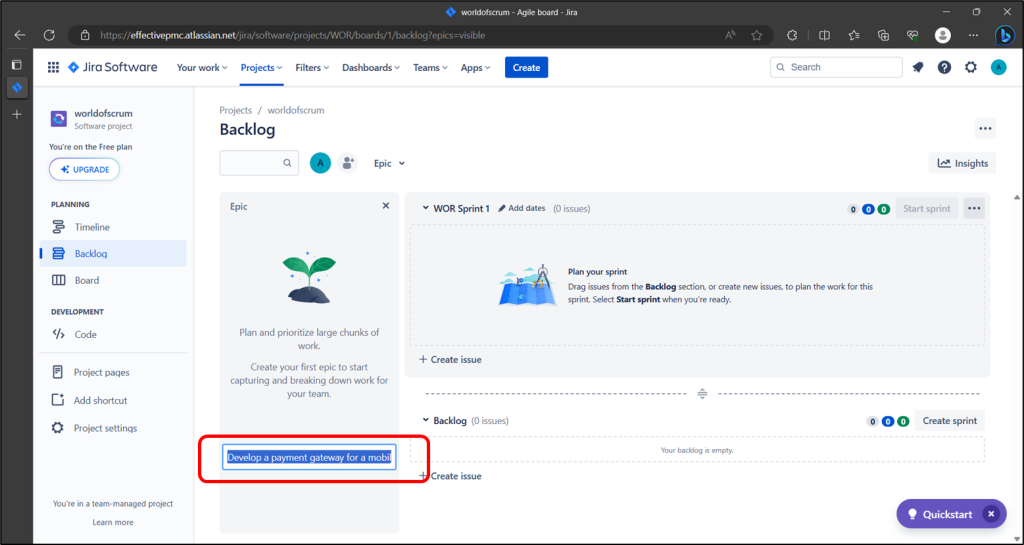
Click on Create epic and describe your epic details
Epic will be created as seen in follow screen shot.
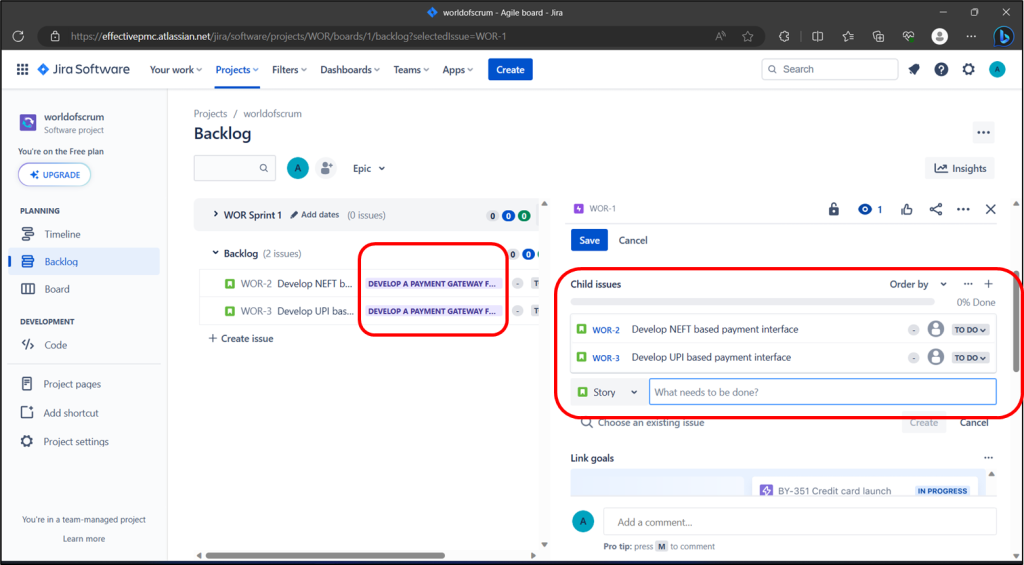
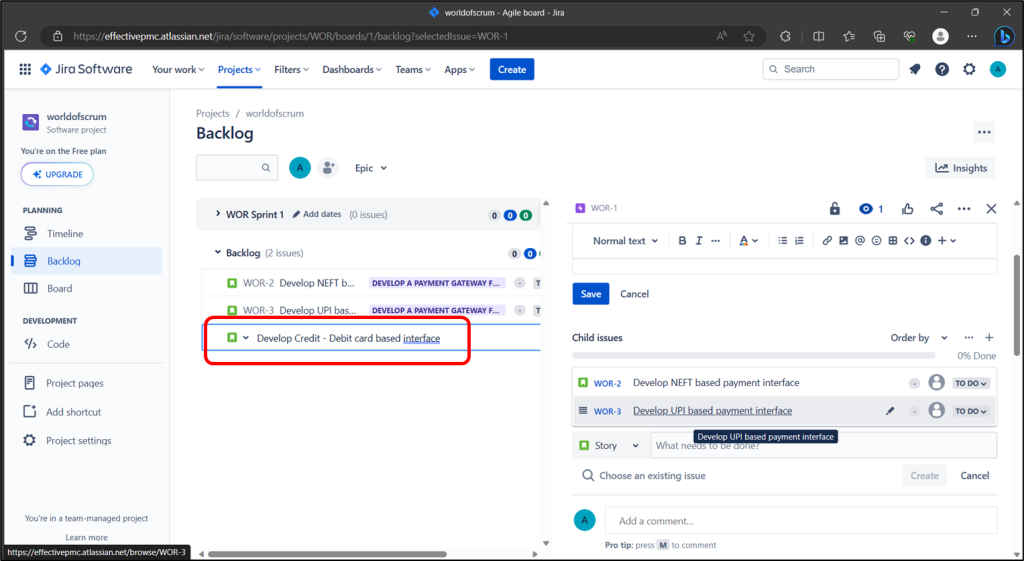
Now add details of user stories as “Issues” under EPIC.
Enter Stories details (Remember…. Issues = Stories in JIRA)
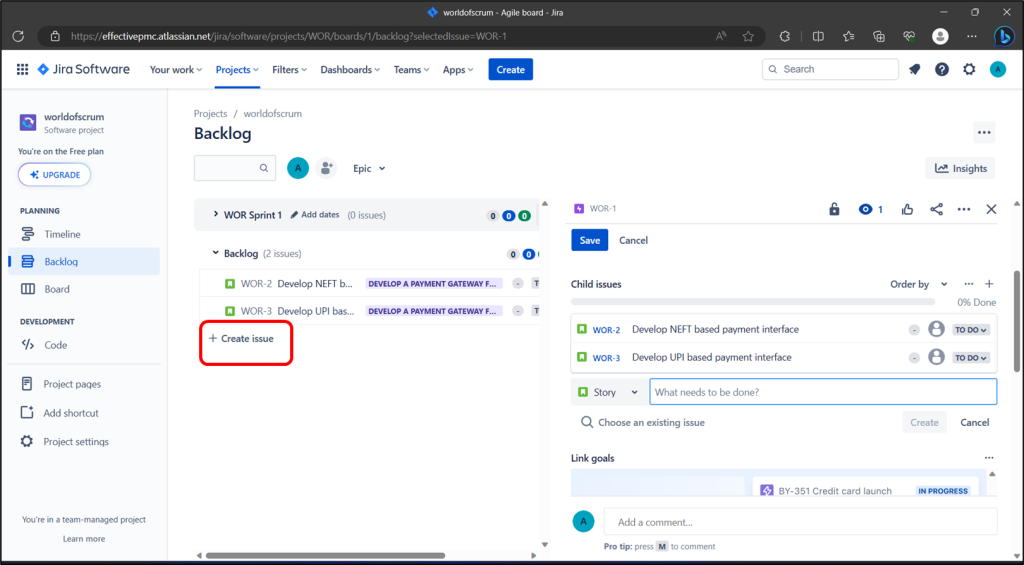
If epics are not needed, you can create the User story directly using “Create Issue” option on backlog.
Create an issue
To create an issue in JIRA, the user should have “Create Issue” permission in the project. Admin can add / remove the permission.
There are a few different ways to create issues:
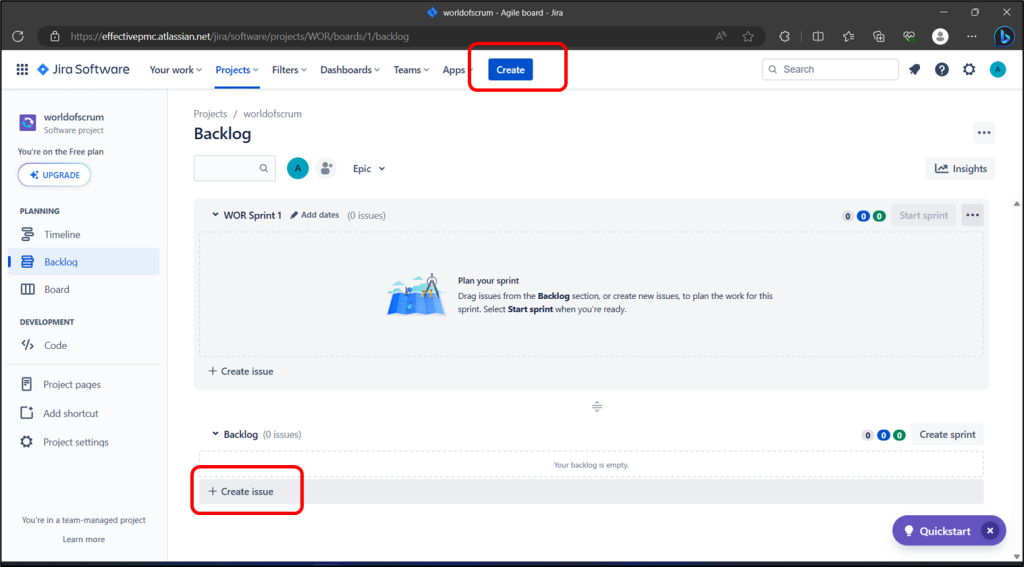
“Create” – From the top navigation bar, anywhere in Jira
Or
“Create issue” – From On the backlog
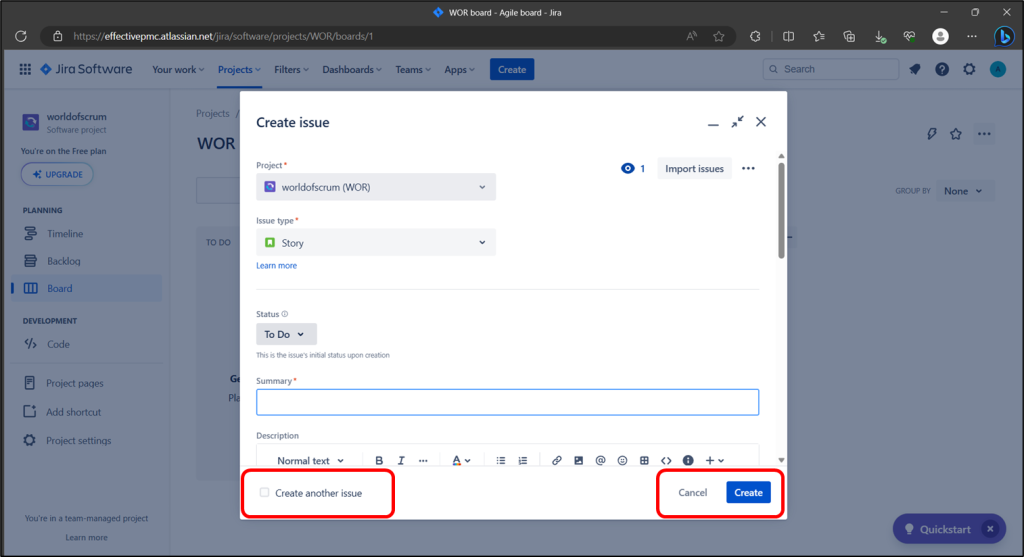
The following screenshot shows how to create an issue by providing the required and optional details.
If the “Create another” checkbox is not checked, after clicking on the Create button, the user will have to navigate to the Dashboard and a pop-up will display on the right side with an issue id and summary.
JIRA – Edit an Issue
To edit an issue in JIRA, the user has to navigate to the issue, which is required to edit and the click on the issue to open the page. It will open the edit issue page that is similar to the create page.
Create sub-tasks (Optional)
Issues can also be further divided into sub-tasks for ease of tracking or need of project. Then these subtasks can be assigned and tracked individually. You might create sub-tasks for any of the following reasons:
To split an issue into even smaller chunks for ease of tracking or need of project.
To allow various aspects of an issue to be assigned to different people if part of same module or function.
To create a to-do list for an issue
Please note that Subtasks cannot have a subtask of their own.
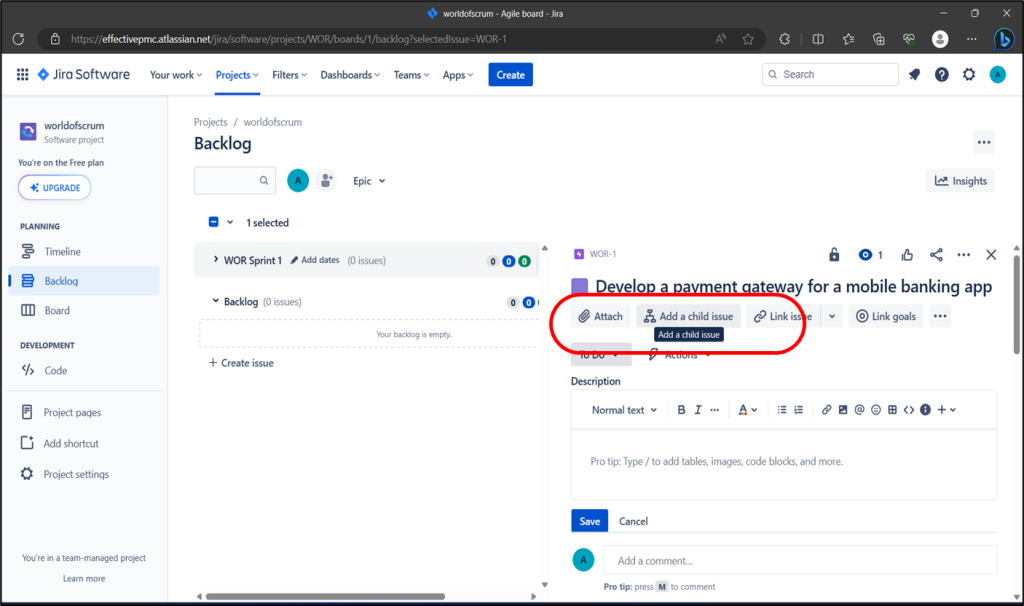
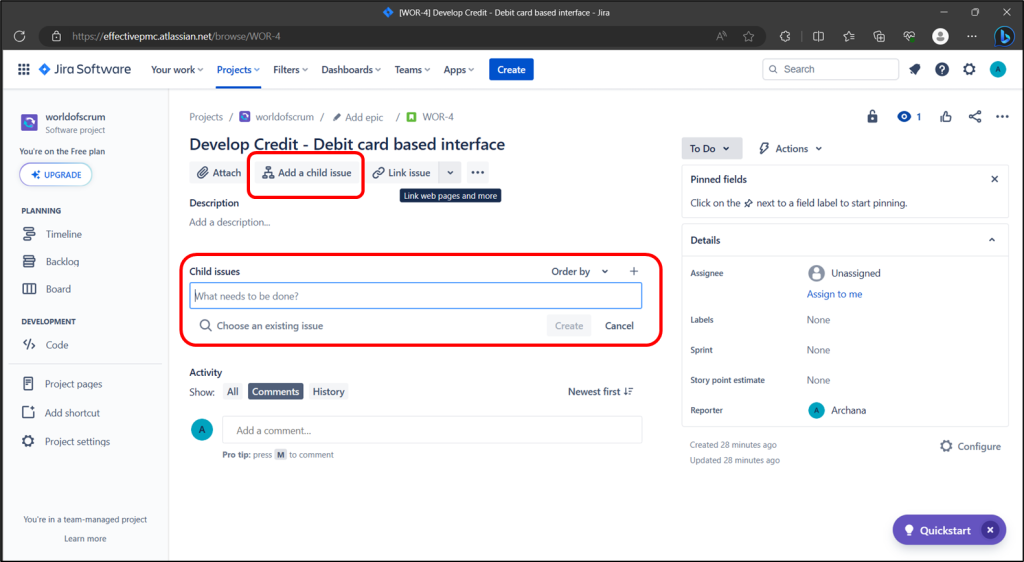
To create a sub-task:
Navigate to an issue and select Add a child issue.
Fill in the details as needed. Click Create to create the subtask
Convert Issue to Subtask & Subtask to Issue
In this Section, we will understand how to convert an issue to a subtask. For doing this, we should follow the procedure given below.
JIRA – Convert an Issue to a Subtask
We should consider the following points while converting an issue to a subtask.
An issue cannot be converted into a subtask if it has its own subtask.
To convert such an issue into a subtask, we should first convert all the subtasks of issues into a standard issue and after that convert the issue into a subtask.
Subtasks cannot be moved from one issue to another directly.
To move a subtask from one issue to another, first convert all sub-tasks into issues and then again, convert issues to subtasks by giving the parent issue name while converting.
Let’s learn how to covert a subtask to an issue.
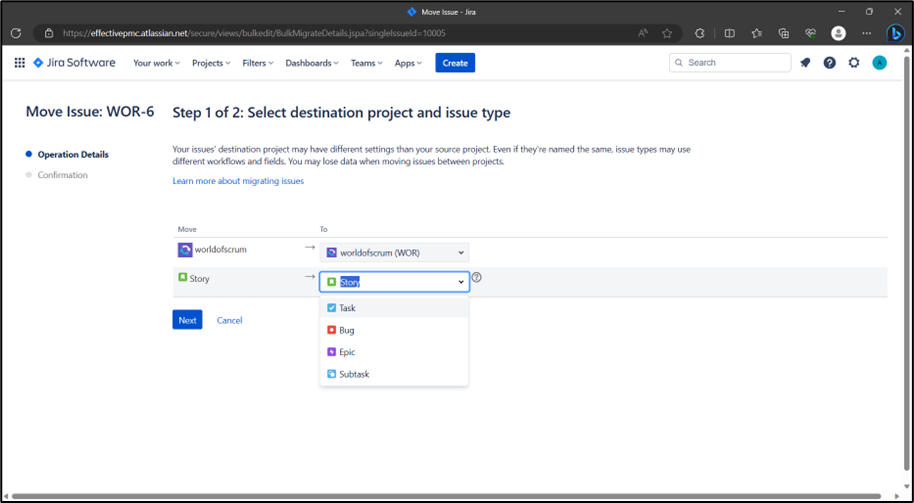
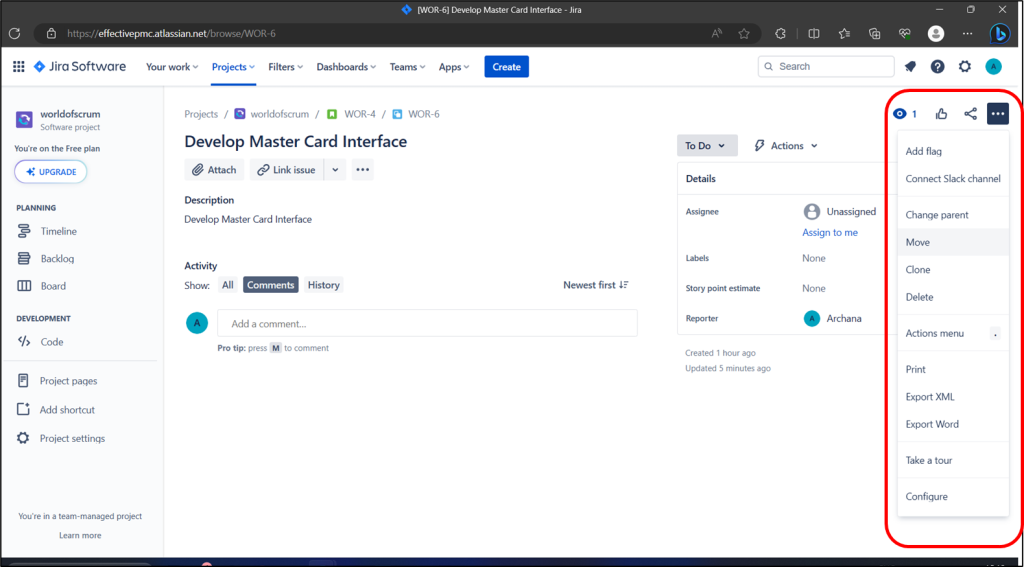
To convert an issue to subtask, we should first navigate to the issue that needs to be converted into a subtask. Then, Select More → Move.
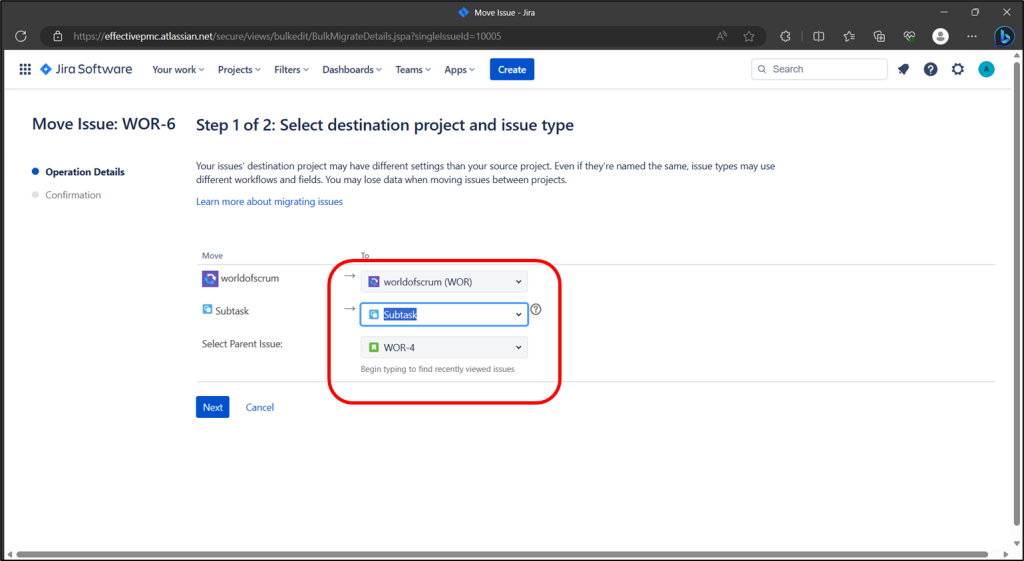
On Select destination project and issue type screen – Change the “Story” dropdown to “Subtask”.
“Select Parent Issue” – option will be displayed. Select appropriate parent for the issue and Click “Next”
Confirmation message “Update fields for ‘SubTask’ issues in the ‘Your’ project” will be shown. Click “Next” & “Confirm”
JIRA – Convert a Subtask to an Issue
To convert a subtask to an issue, we should first navigate to the subtask that needs to be converted into an issue. Then, Select More → Move.
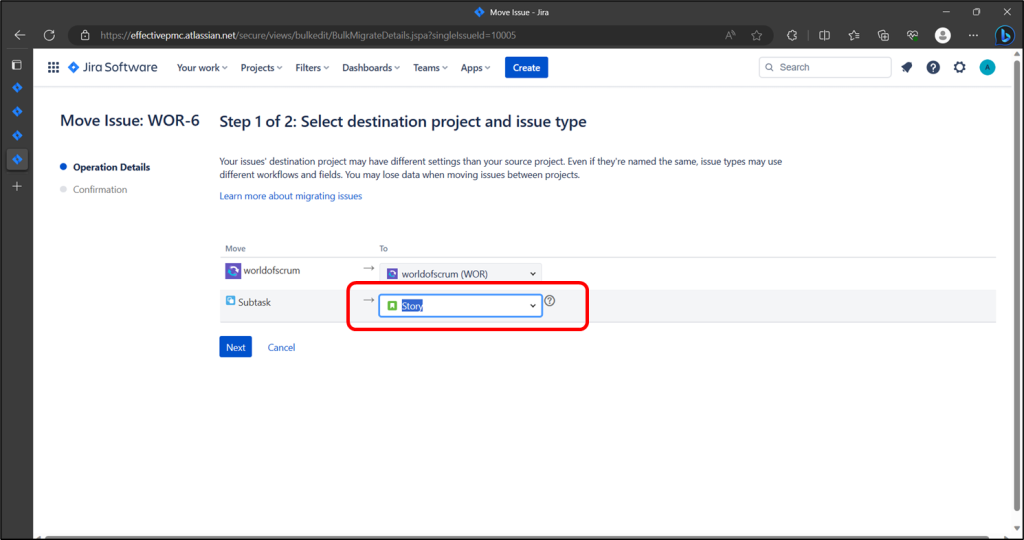
On Select destination project and issue type screen –
Change the dropdown for “Subtask” to “Story” and click “Next”
Confirmation message “Update fields for ‘Story’ issues in the ‘Your’ project” will be shown. Click “Next” & “Confirm”
Using Sprints in Jira
To implement sprints in Jira set of steps need to followed. They are listed below.
Hold the sprint planning meeting
Sprint planning meeting allows the entire team to discusses the sprint goal and the stories from product backlog. The development team creates detailed tasks and estimates for the high-priority stories. The development team then commits to completing a certain number of stories in the sprint. These stories and the plan for completing them become what is known as the sprint backlog.
In Scrum, teams work on different tasks in sprints. These are scheduled periods, usually is of 4 weeks long. Before working with a sprint, the team usually holds a special ceremony called a planning meeting to identify a sprint goal and define the issues for current sprint. Below are listed the step to create and start SPRINT in JIRA
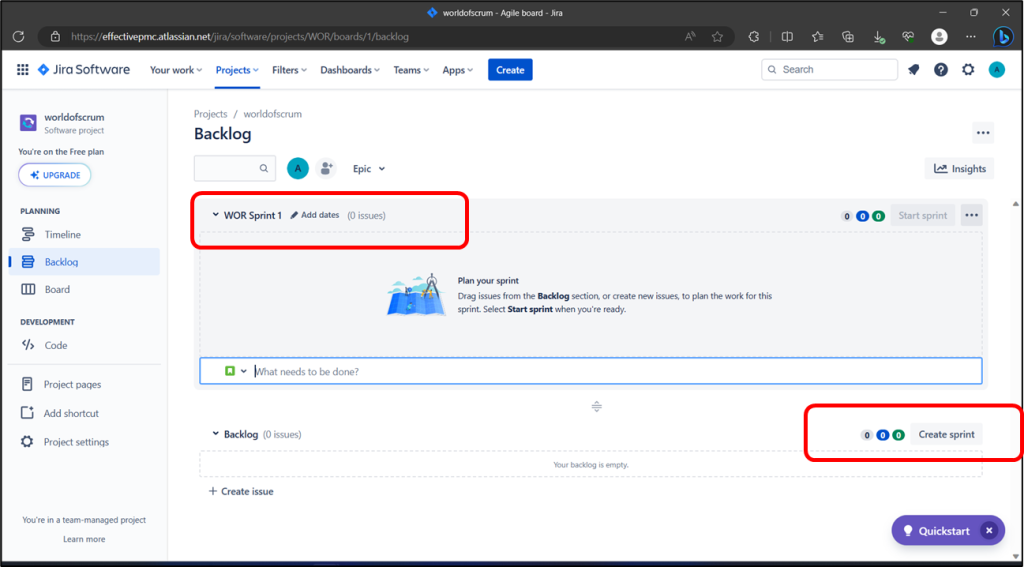
A Default 1st sprint is created in JIRA as you create the project and backlog.
If you need to create more sprints go to the Backlog of your Scrum project.
Click the Create Sprint button at the top of the backlog
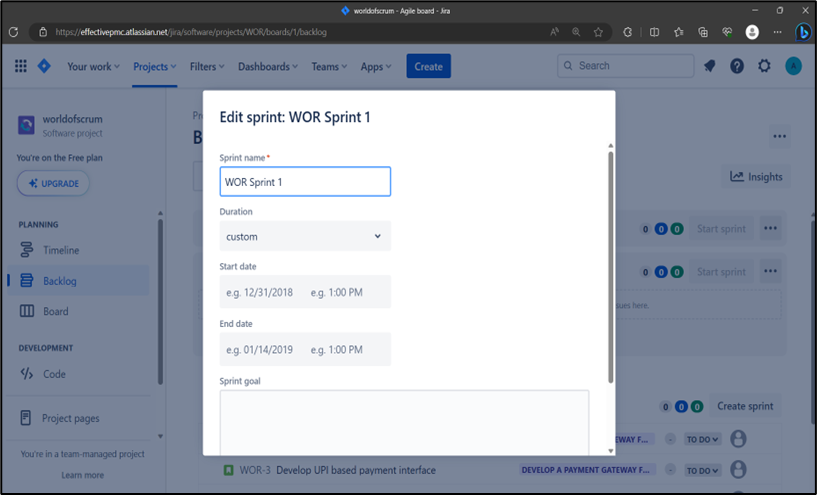
Click on pencil icon to edit the sprint details.
Name the sprint.
Add a duration of the sprint and start and end dates.
Add the sprint goal as agreed to in the sprint planning meeting.
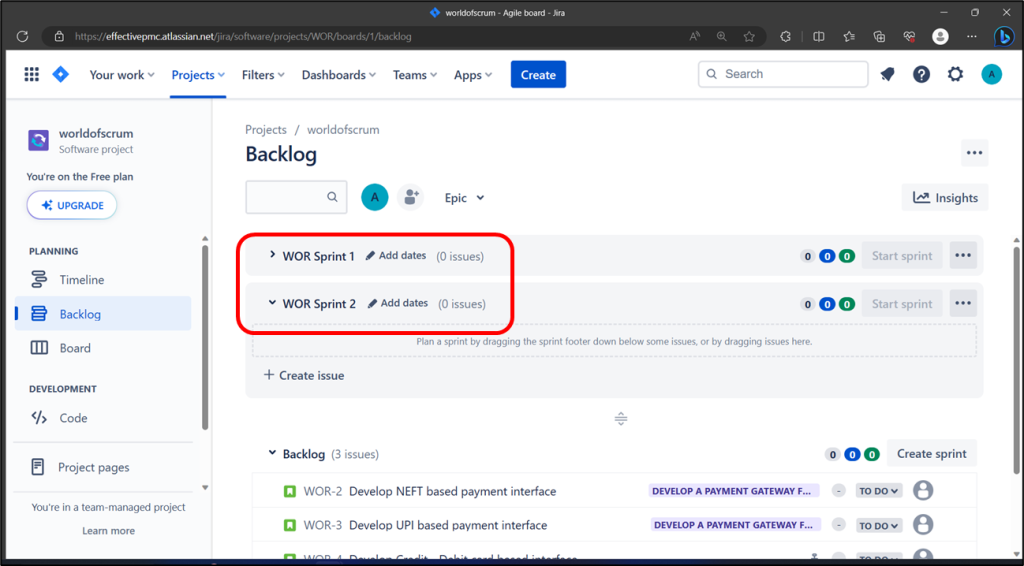
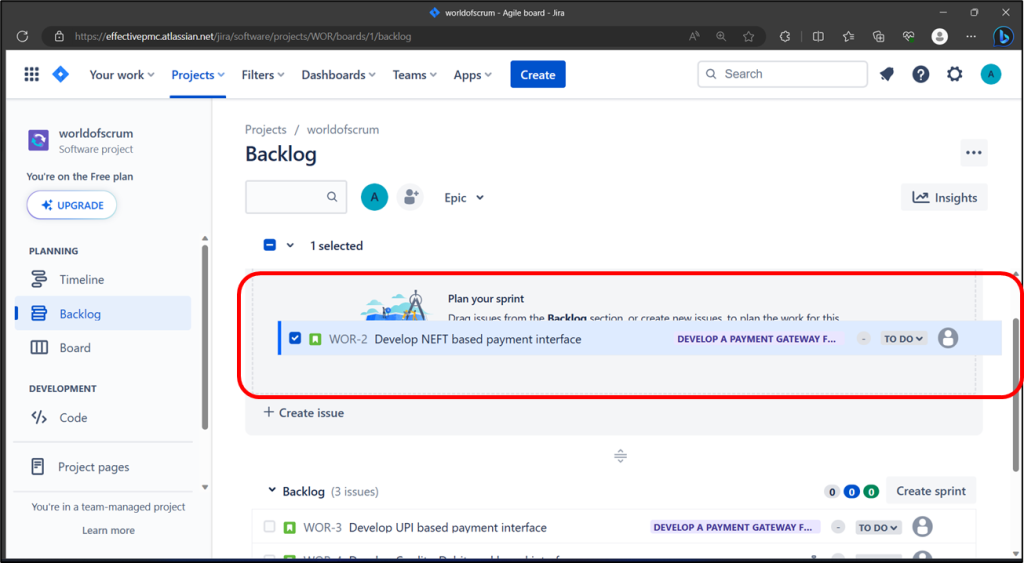
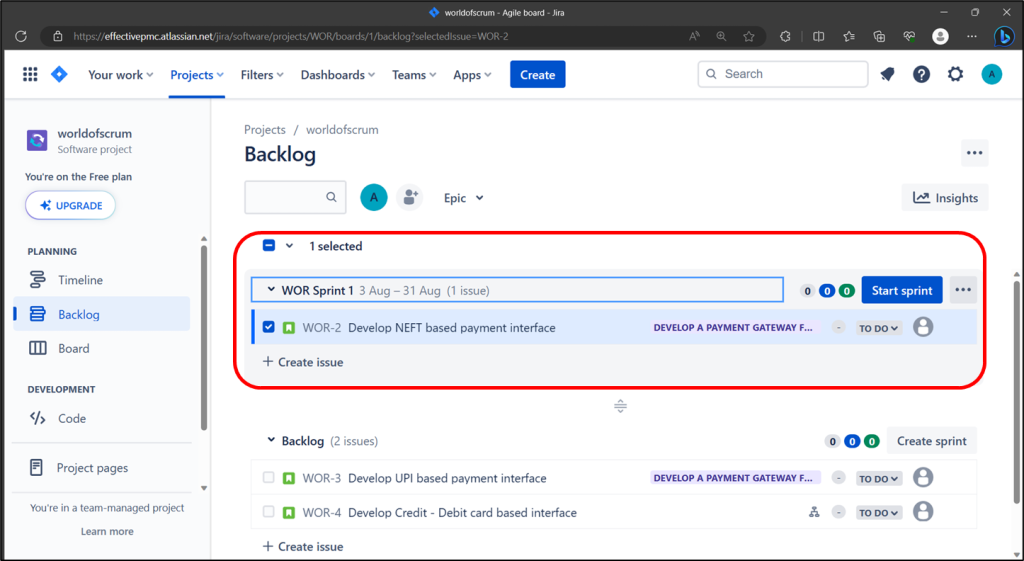
Now fill your sprint with stories from the backlog
To add stories to your sprints
Navigate to the Backlog.
Drag and drop issues from the Backlog onto your sprint.
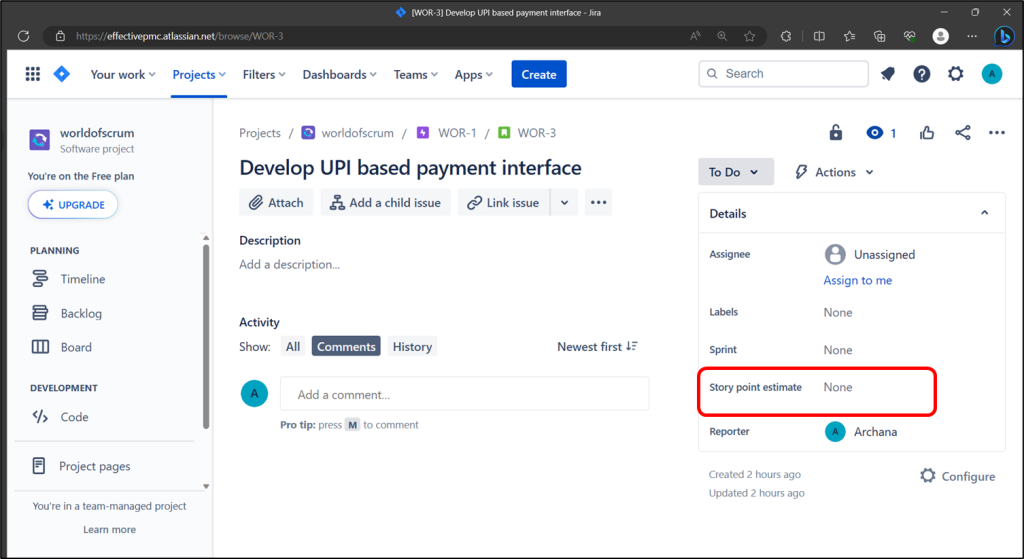
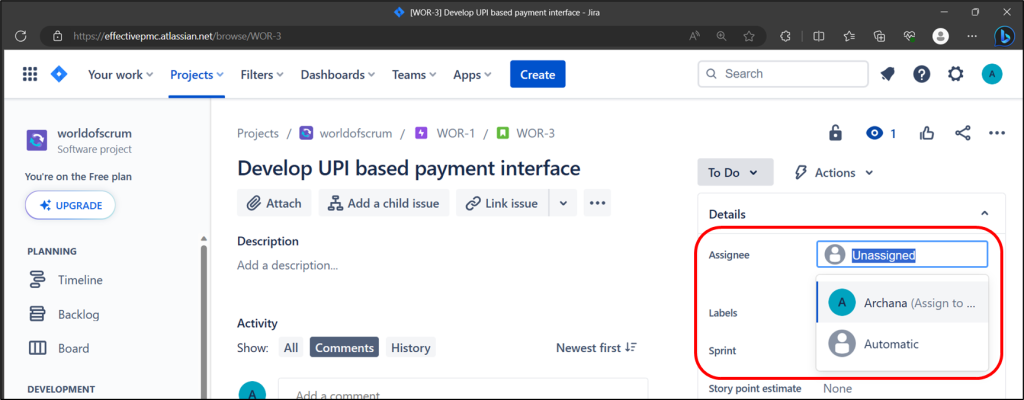
To assign stories in JIRA
Navigate to the story you want to assign.
Open the details pane.
In “Assignee” select the team member name
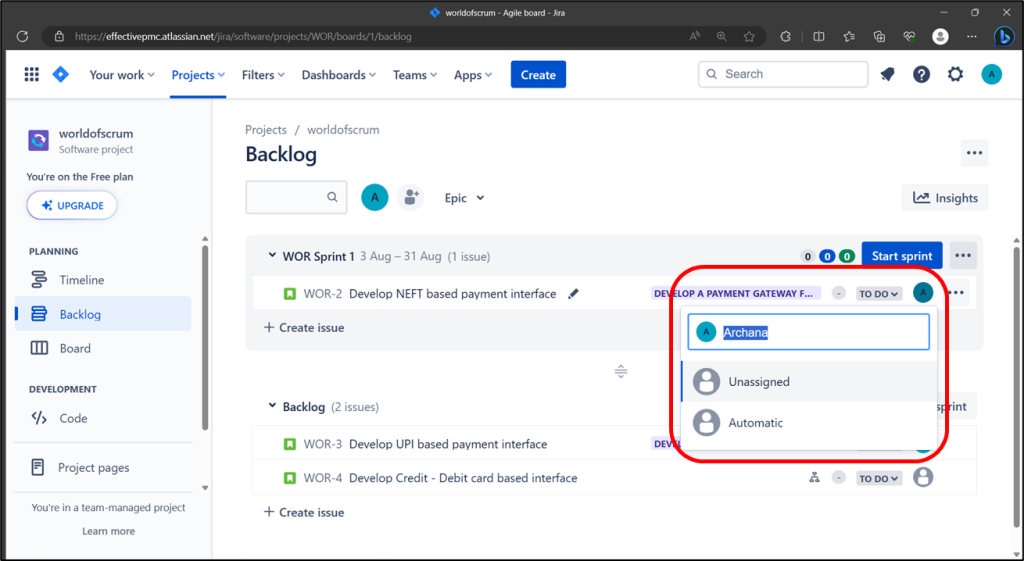
Or
Click on the assignee from backlog stories and select the team member.
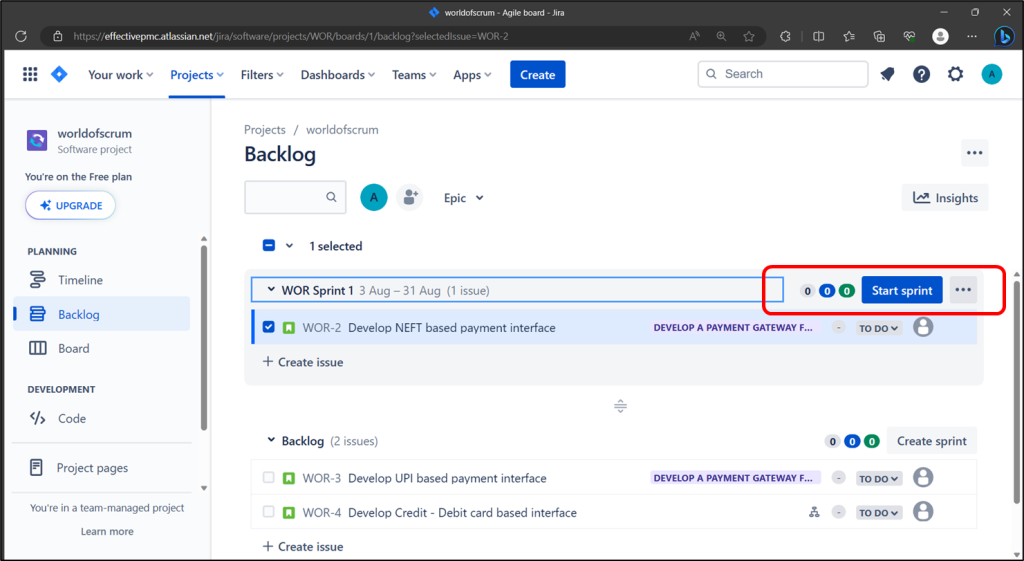
To start a sprint
Go to the Backlog of your Scrum project.
Find the sprint that you want to start and click Start Sprint.
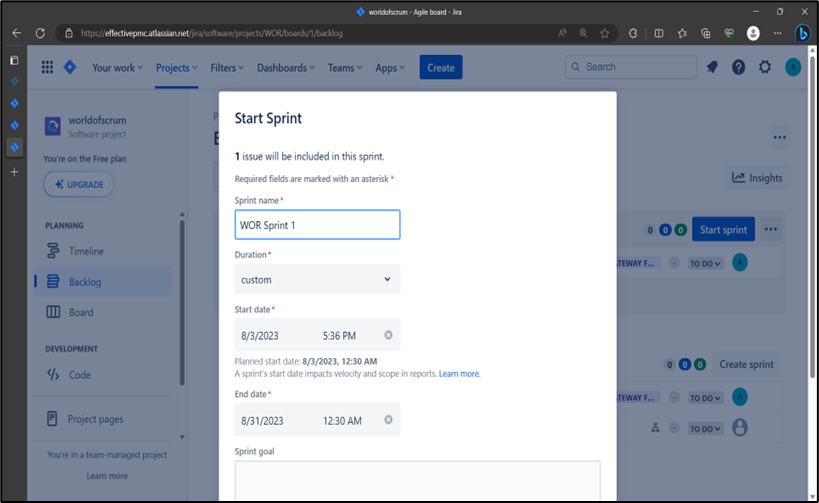
In Start Sprint dialog box Enter Duration / Start / End Date / SPRINT Goal.
Click “Start”
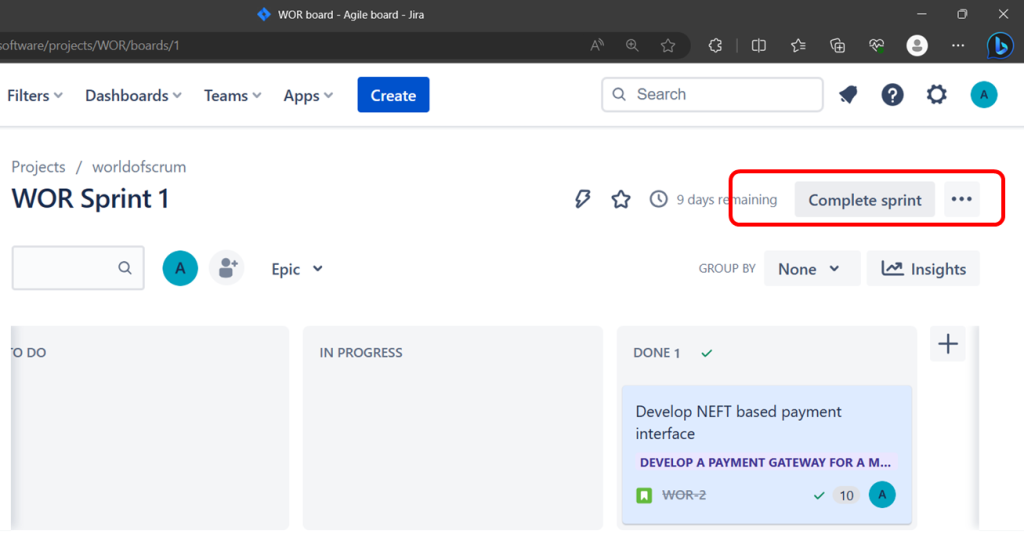
Your Project Board will display the SPRINT Workflow ( TO-DO, In-Progress, Done)
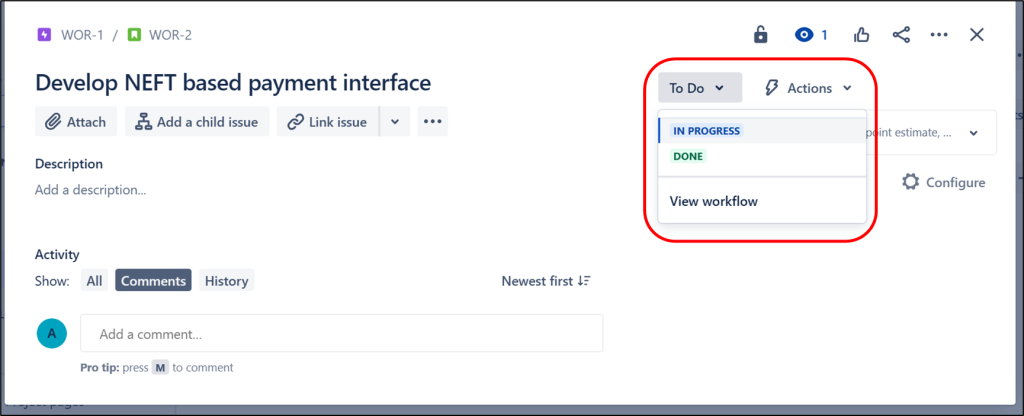
Team will pick up the work – User Stories. (Moving them from To-Do to In-Progress status. Then eventually, done!
To Change the Story Status, Just drag and Drop on Work Flow or Open the issue and Change the status.
Hold the daily standup meetings.
View Sprint Report & Burndown Chart in Jira
Use Sprint Report to watch how your team advances throughout the assignments. To access it, go to the appropriate project, click Reports > Sprint Report and choose the suitable sprint from the drop-down menu. There is also a Burndown Chart in the Sprint Report. It shows the actual and estimated amount of work to be done in a sprint. The horizontal x-axis in a Burndown Chart indicates time, while the vertical y-axis typically indicates story points.
Hold the sprint review meeting
Sprint Review is a sharing meeting where the team shows what they’ve Created & delivered in that sprint. Each sprint usually produces a working part of the product called an increment.
Hold the sprint retrospective meeting
After you complete the sprint, have your team do a retrospective. Document your retrospective somewhere.
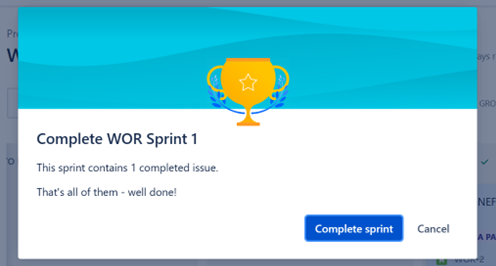
Close the Sprint in Jira
Go to the Active sprints in the Scrum board and choose the sprint to be closed in the drop-down menu. Then click Complete Sprint. Issues which were not completed from this sprint can be transferred to the backlog, other sprint, or a new sprint.
Now repeat step from “Hold SPRINT Planning Meeting” to “Close SPRINT” for each of your next Sprints.
How to Access Jira Reports
JIRA provides different types of reports within a project. It helps to analyze the Progress, Issues, Showstoppers and Timeliness of any Project. It also helps to analyze the resource utilization as well.
How to Access Reports
To access reports in JIRA, the user should go to Project → choose Specific project. The following screenshot shows how to navigate to a specific project.
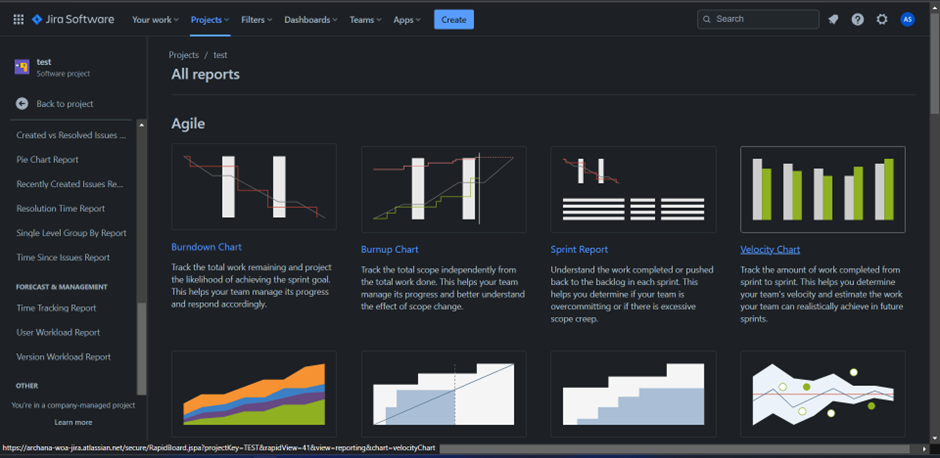
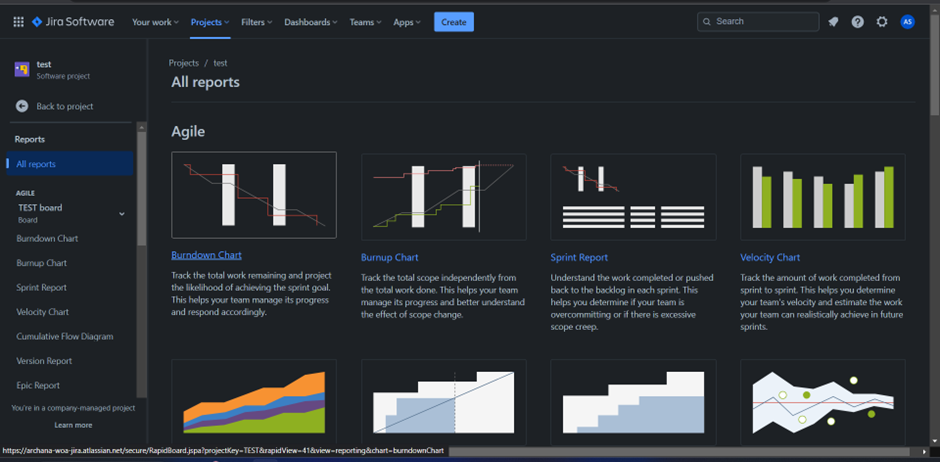
Click on the Reports icon on the left side of the page. It will display all the reports supported by JIRA. The following screenshot shows how to access the Report section.
Type of Reports
JIRA has categorized reports in four levels, which are −
Agile
Issue Analysis
Forecast & Management
Others
Let us now discuss the features of the above-mentioned report categories in detail.
Agile
Following are the list of features of Agile Reports.
Burn down / Burn Up Chart − Track the total work remaining, also whether sprint is achieving the project goal or not.
Sprint Report − Track the work completed or pushed back to the backlog in each sprint.
Velocity Chart − Track the amount of work completed from sprint to sprint.
Cumulative Flow Diagram − Shows the statuses of issues over time. It helps to identify high-risk issues or unresolved important issues.
Version Report − Track the projected release date for a version.
Epic Report − Shows the progress towards completing an epic over a given time.
Control Chart − Shows the cycle time for the product, its version or the sprint. It helps to identify whether data from the current process can be used to determine future performance.
Epic Burn Down − Track the projected number of sprints required to complete the epic.
Release Burn Down − Track the projected release date for a version. It helps to monitor whether the version will release on time, so mandatory action can be taken if work is falling behind.
Issue Analysis
Following are the list of features of Issue Analysis.
Average Age Report − Displays the average age in days of unresolved issues.
Created Vs Resolved Issue Report − Display the number of issues created vs the number of issues resolved in given period.
Pie chart Report − Shows a pie chart of issues for a project grouped by a specified field.
Recently Created Issue Report − Shows the number of issues created over a time-period for a project and how many of those were resolved.
Resolution Time Report − Displays the average time taken to resolve issues.
Single Level Group by Report − .It helps to group the search results by a field and see the overall status of each group.
Time since Issues Report − It helps to track how many issues were created, updated, resolved, etc., over a time-period.
Forecast & Management
Following are the list of features of Forecast and Management type of reports.
Time Tracking Report − Shows the original and current time estimates for issues in the current project. It can help to determine whether work is on track for those issues.
User Workload Report − Shows the time estimates for all unresolved issues assigned to a user across projects. It helps to understand how much a user is occupied, whether overburdened or has less work.
Version Workload Report − Displays how much outstanding work is remaining per user and per issue. It helps to understand the remaining work of a version.
Generate A Sample Report :
Burndown Chart
It displays the total work remaining to achieve the sprint goal for a given time to sprint. It helps the team to manage the progress and respond accordingly. This chart is an important feature of Agile – Scrum methodology.
Generate a Report
To generate a report, the user should follow the steps given below.
Step 1 − Go to Project → choose a Specific project. Click on the Report icon on the left side of the menu. Go to Agile and click on Burndown chart. The following screenshot shows how to access a Burndown Chart.
Jira® is registered trademark of Atlassian.com
We Value Your Privacy
To provide the best experiences, we use technologies like cookies to store and/or access device information. Consenting to these technologies will allow us to process data such as browsing behavior or unique IDs on this site. Not consenting or withdrawing consent, may adversely affect certain features and functions.
Functional
Always active
The technical storage or access is strictly necessary for the legitimate purpose of enabling the use of a specific service explicitly requested by the subscriber or user, or for the sole purpose of carrying out the transmission of a communication over an electronic communications network.
Preferences
The technical storage or access is necessary for the legitimate purpose of storing preferences that are not requested by the subscriber or user.
Statistics
The technical storage or access that is used exclusively for statistical purposes.The technical storage or access that is used exclusively for anonymous statistical purposes. Without a subpoena, voluntary compliance on the part of your Internet Service Provider, or additional records from a third party, information stored or retrieved for this purpose alone cannot usually be used to identify you.
Marketing
The technical storage or access is required to create user profiles to send advertising, or to track the user on a website or across several websites for similar marketing purposes.